Monday, December 14, 2015

RPP Catch Up...Cuz Everyone's Sharing


Here are a few pics of work from our Rapid Prototype Production course. We had to make games within two weeks, in teams of programmers, artists, and producers. So that meant pushing myself in terms of time management in order to keep up with the teams needs.

These first three images are of assets made for Egg Story. Was a first person experience, for a rapid prototype that was focused on building narrative. This dinosaur was challenged with saving her eggs in the midst of a volcano irruption and despite various obstacles. I wish I had gotten video footage of this gaaaaame... These meshes looked sooo good in UE4. Was so crazy grateful. But this was the second round of RPP so I wasn't aware of how much I would want footage later.

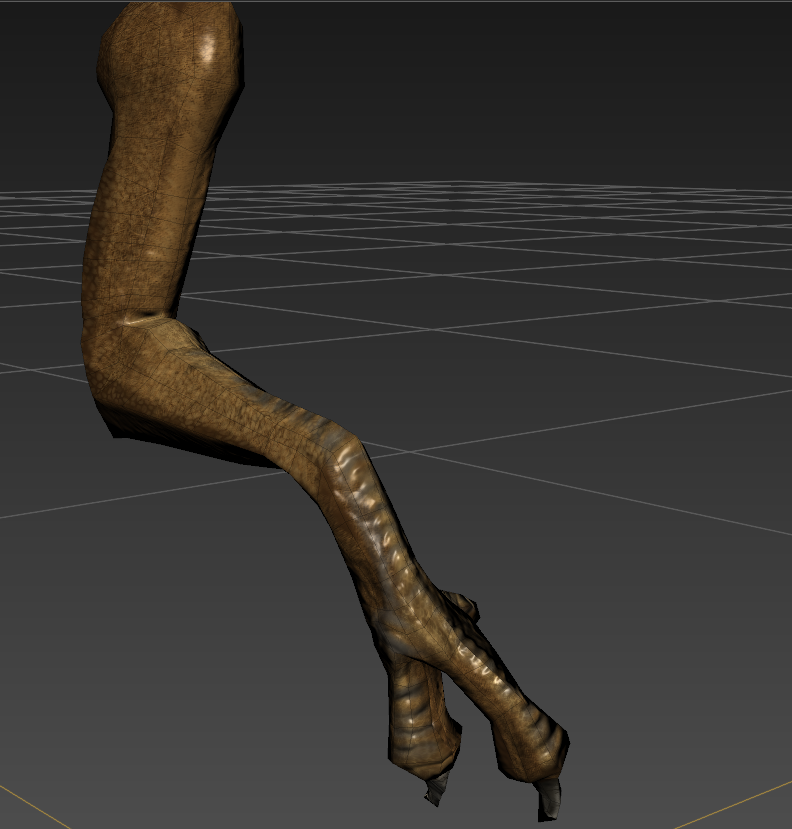
 I made arms inspired by the Deinonychus. Built a low poly mesh in maya and then sculpted them in ZBrush. From there I baked maps the normal map and was able to paint color maps via Mudbox.
Was my first time building something from complete scratch and no guidance. SO it was quite the adventure. My teammate/tech artist Katie Freeman was able to salvage this model, in terms of UV's. I wasn't experienced in UV maps at the time, so that was huuuge. I did have to tinker with the model more and fix non manifold issues. Happy it worked out...


 I did the same for a log, and floor crack. 
This is an image of what I set up in maya, featuring all of the assets.


The following images are from one of my favorite RPP games to work on. Was also the most challenging because I was the only artist. This was my first experience with creating sprite sheets and animating. I learned how to use Flash! I know flash is growing obsolete, but I still really love it. Was soooo happy to take this opportunity to learn how to use the software. I made sprites like the environment platforms and characters in Adobe Illustrator, edited their animations in Flash, and painted other assets such as the background in Photoshop.

This 2-player game is called Spirit Spat. Gus is a fire elemental spirit and Lydia is an earth elemental. They have a growing rivalry in terms of territory. So they use their powers to mark territory with their unique markers (plants/fire) while also blocking each other off. Who ever maintains the most territory by the end of the game session wins!


These are the little spirit helpers that spawn after enough territory markers are set--and help spread even more markers. How they spawn is hilarious because they basically fill the map. A happy accident that our programmers took advantage of.

Lydia 


Lydia's UI. The programmers set a meter on top of these bars, that features how much elemental power the characters have until they experience a cool down period. Also features number of spire types. Lydia's vines are easier to break down but also stun Gus and his elemental helpers.

Sprite sheet for lives and for the Lydia's toxic vines.


This is our dear Gus


Gus's UI and earth spires that boost/elevate him up since he can't fly like Lydia.
These spire's are also stubborn when you try to break them down.


Here is the last asset I worked on for the project. A background speed painting. I hardly got any sleep with work on Spirit Spat balanced with my core work on 2D3D hw --Scalarrrgh, but I loved every single moment of it. And the game turned out super fuuuun. Though I was the only artist, one of the producers, Matt can be considered an honorary artist! He helped me by making the territory markers and wining screens for each character. That was huuuuge! Really saved me there. It was hard to attempt to do everything in the span of just 2 weeks. 

Concept Art for Starfish Island


Meet my Seagull for Starfish Island. His/her name is...Gullah.. I decided that just this moment.Throwback...Anyway!

Here is the original concept art I worked on. Besides the art I had to make Gullah's boxy proxy models. The concept was a challenge, cuz it had to look extra cartoony, but I tend to veer towards a realistic aesthetic. So I punched out some vectors and abstracted the original look. My instructor encouraged me to keep pushing towards a simplistic and yet iconic design. So he recommended I study the Finding Nemo design for a gull.

 Later he advised that I combine the two and make Gullah my own. And so I tried my best!


I had issues with UV normal map seams.. They were baaaad. And then I realized that was because the low poly model needed a lot more help before it could match my ZBrush sculpt for reference. So I had to make changes to his UV's  (really Brian helped like crazyyyyy!!) and recover from being UV-cut-tool-happy... Changes to UV's explain why the color map is so messy. And yet the colors still mapped well. I just know how to do a lot better next time. Going to learn retopology with help of high res meshes, this winter break.

Very happy with Gullah, we've shared great times. Still he looks way better in Unreal Engine 4, alongside our island's other assets.


My trees were worked quite a bit from these initial sketches. A Malayan palm/coco and a fiji fan palm. I really wanted to make trees. And this was an awesome experience. Wasn't as hard as I thought it would be! UV's weren't a problem at all. I just had to learn a little more about transparency maps. And the transition between maya and unreal engine 4--in terms of transparency..

Color maps! Much neater this time. I stretched the UV's to make one of the palms taller and warped though. Won't do that next time.Will rework the geometry and UV's for that.


Here is the gradient I used to apply wind to only the leaves of my trees! With UE4 wind effect node.

2D3D Final Art Assets

Here is a collection of images featuring my art assets for the Island our 2D3D class created. This has been a HUGE learning experience. Gullah's mesh with my Malayan palm inspiration and Fiji Fan palm inspiration. Oh and some last minute rocks from a leftover tile texture project. This presentation was made in Maya. All models look way better in UE4. But I can't grab shots of that map just yet.


Poly Count


Wednesday, November 25, 2015

Scalarrgh's Awkward Dance Solo

I made Scalarrgh from scratch, for 2D3D class. He was difficult to make for all of those weeks. And I thought I wouldn't miss him. But he saved me for this Common Art Project. I worked on skin weights for Sammy StarFish for the longest. They wouldn't work in my favor. Fortunately Scalarrgh poked by and presented new FUN challenges. I learned a LOT about painting weights. Really grateful for this exercise though it was difficult rigging for the first time.

Here are some images of Scalarrgh's final design:


Here is Scalarrgh doing his thing. I noticed while animating that his awkward skin test matched the bass music I'd been listening to along the way. Unfortunately I wasn't able to export my recording taken while rigging him, because Camtasia Studio 8 broke on my somehow. Maybe it's a server issue.

Sorry ahead of time, if the music choice doesn't fit you. Scalarrgh and I liked it a lot.


Scalarrgh is alive and that's super exciting. In case you don't read my youtube description:
'I rigged and animated my pirate, Scalaarrrgh. Guess the origin of his name? Painting the weights sort of kicked my butt--still I feel so much more excited about practicing rigging. I want to rig EVERYTHING! And I've found a new love for animating. Though this animation is not legitimate at all.

As for the Maximo models, I had the exercise of retargeting their skeletons and applying animations. So I was able to use what I learned from aligning their skeletons to animate Scalargh's fbx from Maya.

LOVE this mixtape sooo much!
Delicast 013 mixed by Henry Bergman
https://soundcloud.com/delicatessounds/henry-bergman-offbeat-delicast-013
'

Scalarrgh's Awkward Dance feat. Controller


Tuesday, November 10, 2015

Playing With Advanced Materials with Blueprints

This was intriguing. I liked this activity. But I had a little trouble with getting the timeline to work...


Monday, October 19, 2015

UV:Maps and Sculpt for Scalarrrgh

Checkout Scalarrrrgh's Cleaned Up Geo!!!
I worked so hard on it. But I will work even harder next time! ( - 3 -)

UV mapping was a bittersweet challenge. Still when I accomplished fixing up UV maps that was the best feeling everrrr!

I want to be proud of my sculpt. But it's alright.


Wednesday, October 14, 2015

Exploring Materials in UE4

Here I worked with creating parameters and altering materials with the use of handy instances.

Results are intriguing. Wish I had a stronger idea of which parameters to apply, to do certain things and achieve a diversity of effects. Have to build my mental map.


Monday, October 12, 2015

Introducing Scalaarrrgh

                                            Can you guess the origin of his name?


Wednesday, September 30, 2015

Was his name Kevin or Sam? Sculptin in ZBrush!!

Here is the result of a fun practice exercise. Felt a bit of a block along the way, but got through it!!


Look what happens when you select polypaint from texture!